Getting a new iPad for your child is exciting, but before they jump into their favorite apps and games, it’s a good idea to make sure the tablet is set up for safe and age-appropriate use. Apple offers a range of parental controls, screen time management tools and content restrictions, so you can tailor the iPad experience to meet your family’s needs. Here’s a step-by-step guide to get you started.
{{subscribe-form}}
Step 1: Initial Setup and Apple ID
- Turn on the iPad: Press and hold the power button until the Apple logo appears. Connect to Wi-Fi to continue.
- Create or Sign in to an Apple ID: If your child is under 13, you’ll need to create an Apple ID through Family Sharing on your own Apple device. (This is the best way to ensure parental control over purchases and downloads.)
- Set Up a Passcode and Face ID/Touch ID: Create a passcode only you and your child know, and, if available, set up Face ID or Touch ID for added security.
Step 2: Enable Family Sharing
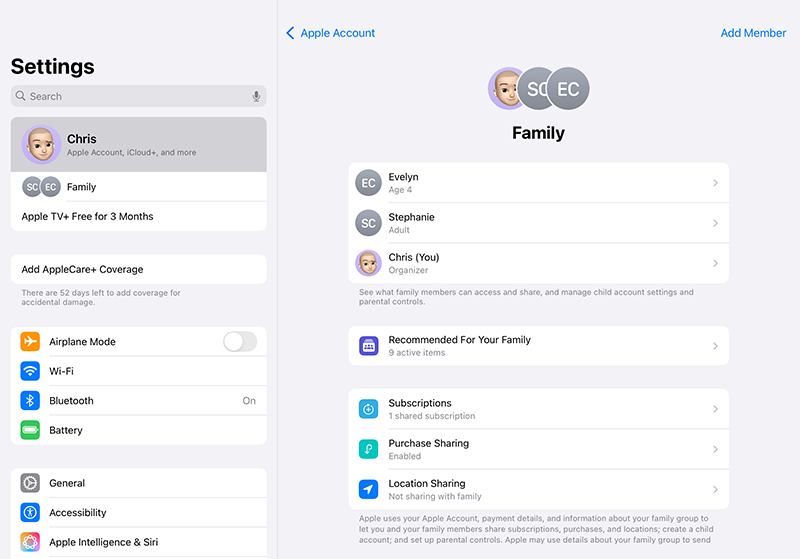
Family Sharing makes managing and monitoring the iPad much easier. Here’s how to get started:
- Go to Settings on Your Own Apple Device: Tap your name at the top and select Family Sharing.
- Add Your Child’s Account: Tap Add Family Member and create an Apple ID for your child if you haven’t done so already.
Step 3: Set Up Screen Time Controls
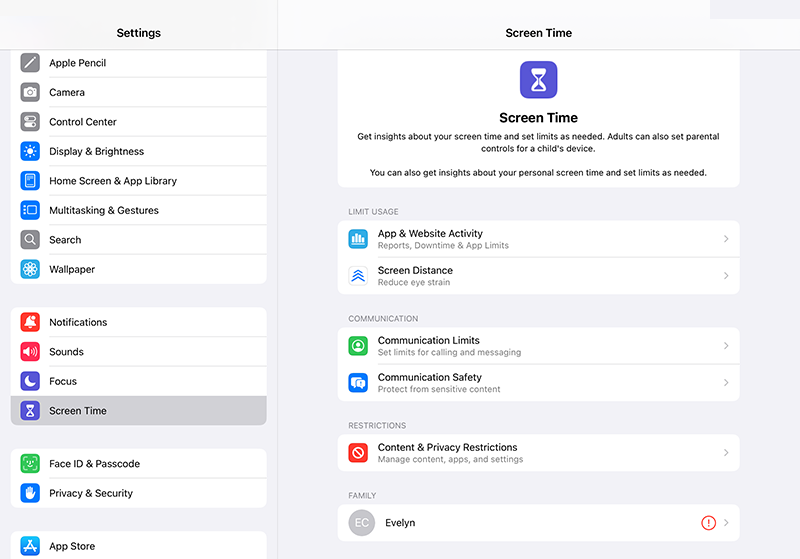
Screen Time is a great tool to manage your child’s screen use. Here’s how to set it up:
- Open Settings on the iPad: Tap Screen Time and select This is My Child’s iPad to begin setup.
- Create a Screen Time Passcode: This passcode will allow you to make changes to Screen Time settings (and prevent your child from adjusting it!).
- Customize Screen Time Settings:
- Downtime: Set a daily schedule for when apps and notifications are blocked, such as bedtime.
- App Limits: Choose daily time limits for app categories, like social media or games.
- Communication Limits: Control who your child can communicate with through calls and messages.
- Content & Privacy Restrictions: Use this setting to restrict explicit content, purchases and downloads.
Step 4: Set Up Content Restrictions
Apple’s content restrictions help you limit access to age-appropriate content on the iPad.
- Go to Settings > Screen Time > Content & Privacy Restrictions: Enable Content & Privacy Restrictions and enter your Screen Time passcode.
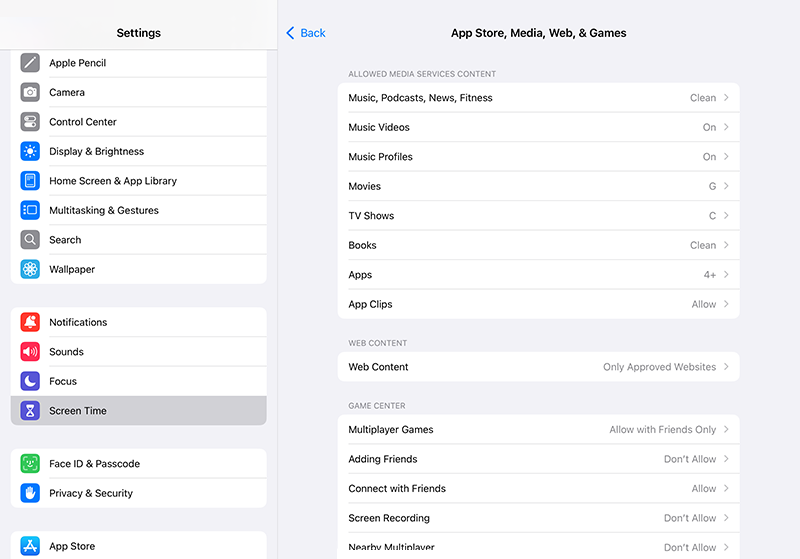
- Choose Age-Appropriate Content: Tap Content Restrictions and select ratings for apps, movies, TV shows and books that fit your child’s age.
- Restrict Web Content: Choose Web Content to limit access to adult sites, or allow only specific sites. For younger kids, the “Allowed Websites Only” setting ensures they only access pre-approved websites.
Step 5: Set Up App Store and iTunes Controls
If you’d like to keep an eye on downloads and purchases, here’s how to do it:
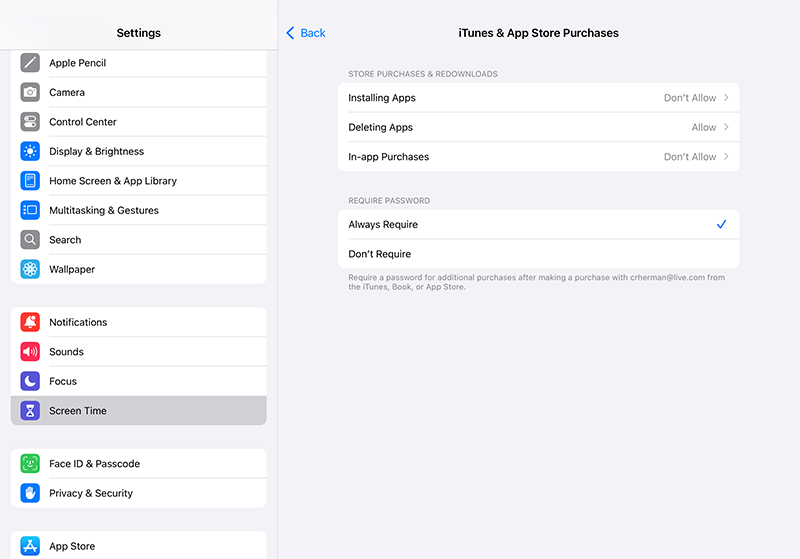
- Enable Ask to Buy: With Family Sharing, you can approve or deny app and in-app purchases directly from your device.
- Limit Purchases: Go to Settings > Screen Time > Content & Privacy Restrictions > iTunes & App Store Purchases. You can require a password for all purchases and even block in-app purchases entirely.
Step 6: Customize Safari and Location Settings
Managing Safari and location sharing can add an extra layer of safety for your child’s iPad experience.
- Restrict Safari Access: In Content Restrictions (under Screen Time), you can limit web access or block Safari entirely if your child is very young.
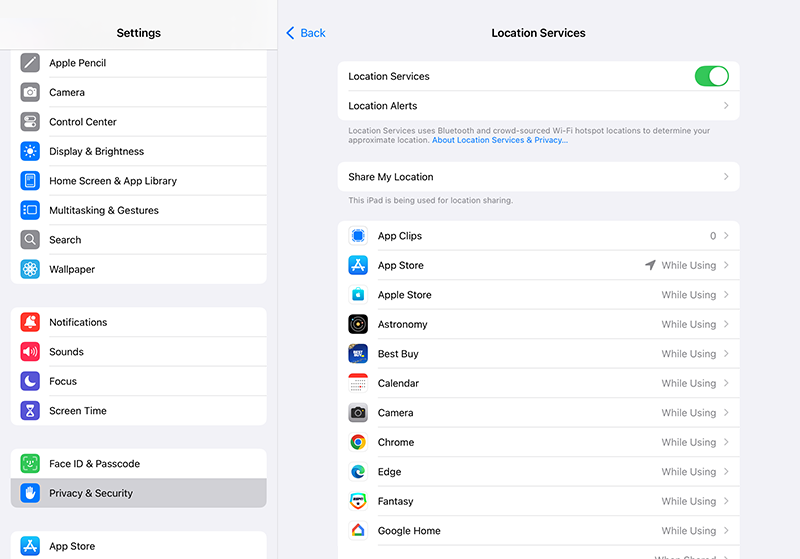
- Location Services: Go to Settings > Privacy > Location Services. You can choose which apps can access location data and set this to “While Using the App” for added security.
Step 7: Enable Guided Access for Younger Kids
If your child is very young or you want to keep them focused on a single app, try Guided Access:
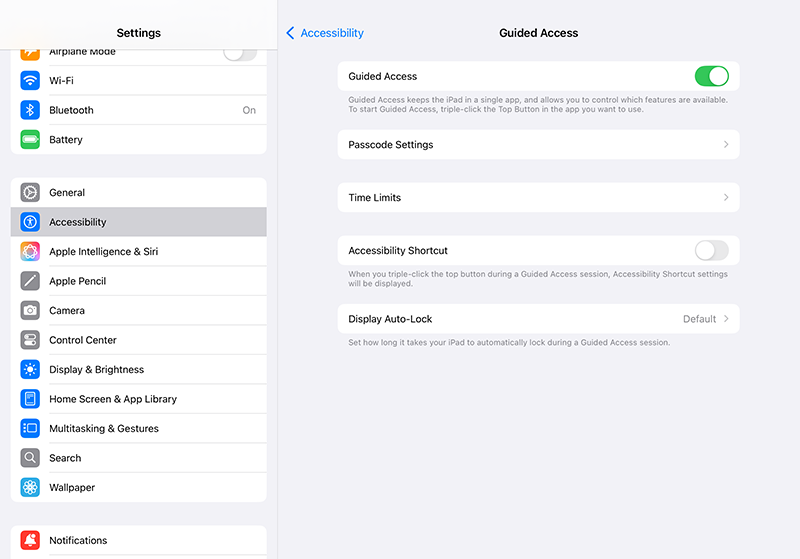
- Turn on Guided Access: Go to Settings > Accessibility > Guided Access and enable it.
- Start a Guided Access Session: Open the app you want your child to use, then triple-click the home or side button. You can control which features are available, like disabling the volume buttons or locking the screen orientation.
- End Guided Access: Triple-click the button again and enter your passcode to exit Guided Access mode.
Step 8: Talk About Screen Time and Safety
Setting up the iPad is just the first step. It’s a great idea to discuss healthy screen habits with your child:
- Set Expectations Together: Talk about what apps they can use and when screen time is over.
- Check In Regularly: Use Screen Time reports to review which apps and activities they’re using the most, and adjust as needed.
- Encourage Open Dialogue: Let them know they can come to you with any questions about online safety or if they see anything confusing or uncomfortable.
With these steps, you’ll have the iPad set up for safe, balanced use—perfect for play, learning and everything in between. Happy setting up!
Image credit: JohnnyGreig / Getty Images
{{messenger-cta}}


